 Brickaizer -
Help Brickaizer -
Help |
Brickaizer -
Help
Tutorial for Standard Colours
Brickaizer has the option to use Standard Colours, instead
of limiting yourself to the brick and Ministeck colours. Although bricks have hundreds of colours, not all bricks are available in the colour you
need, and some colours are hard to get by, or too expensive
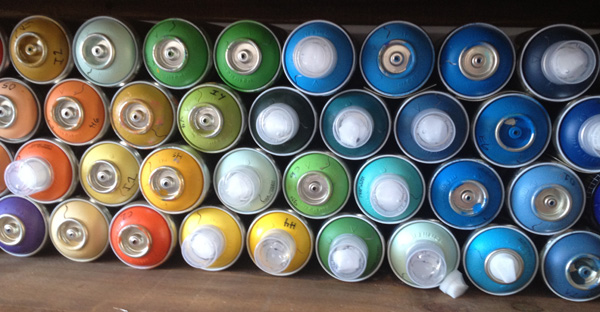
for the amount that you require in the mosaic. The Standard Colours require
one additional step before you build your quite realistic brick mosaic: you need
to apply a (spray)paint coating on the brick before putting it on the building
plates. Commercially available spraypaints are typically following a
standard colour scheme, reliable and repeatable. Some of these Standard Colours
are globally available, and sometimes regionally (like Australian Standard
AS2700 or British Standard Colours). Especially RAL (Europe) and FS 595 (USA)
are widely available in DYI shops. Lesson 1: My preparations for a Standard
Colour mosaic The
second
thing you need to do is to check which colours are commercially available in
your local DYI shop. In case you don't want to limit yourself... no problem, just
order the spraypaints online. Should not be so hard. One can will probably be as cheap
as 3 Euro, so a pack of 32 colours will cost less than 100 Euro.
Much cheaper than buying special bricks and colours via Bricklink or similar websites
for brick sales. If you are done with checking, prune the dataset such
that only the colours remain which you can actually purchase. There is no need to keep
colours in a set you won't be able to buy or only with
great effort or at high cost. Save this file and
(re)check if the data structure is precisely according to the provided
examples. Lastly, as a preparation start
the application and follow these steps to activate the Standard Colour set (we
will use the RAL Classic in this
tutorial): Picture: during
lesson 1 you should now see the above windows. Lesson 2: My first Standard
Colour mosaic
Despite the high amount of colours the RAL Classic standard
is providing quite a good palette to make a very realistic portrait. Especially
skin colours are hard to create with brick colours, so RAL spraypaint can be a
good alternative.
Lesson 3: Reducing the number
of colours We will
demonstrate the two options by first do option 1, wait for result, and then use
option 2. Make sure you always first press the 'Reset colours' button before making a new
mosaic. The
picture below shows the two results. The picture on the left is the calibration result
from our unrestricted use of colours mosaic. As can be
seen from this picture the iterative reduction is resulting in a better overall
quality compared with the quick colour reduction. Differences are seen
in e.g. the eyes (less contrast) and hair (less vivid). Especially
with skin tones this effect is noticeable
: almost as good as the unrestricted colour approach. For
other, less colour sensitive pictures this may not be so outspoken. The
difference in speed is quite different though: fast reduction was a fast as
unrestricted, while the iteration took 16 steps to complete, about 90 seconds in
total. Lesson 4:
Saving and reuse The quickest way to save the current used set of colours and bricks is
to press the 'Copy used' in the Editor window. This will uncheck all the colours that were not used in the current mosaic.
We ran step 3 again, not with 36 colours, to keep a couple of extra
colours at hand when we want to play with the number of colours
later on. We also deselected all bricks except 1x1 and 2x2. With these two you
can make every mosaic in the world, and these two bricks are plentiful and
cheap to buy on the internet. Then we saved the table as 'Skintones'. After
saving the news set is loaded; in the main window you can now also see the
selected colours. All the non-used colours have been omitted and what remains is a
perfectly new table with a selection of paints colours suitable for painting this source picture. In
the screenshot below is what you will see when all the explained steps are
followed correctly.
The new set is now available
as a true (normal) table with bricks and colours. Next time you want to create a
mosaic from a similar picture that requires skin tones, you can now safely use this set
of selected colours. The final check you should now make is to assure that
all the spraypaint colours in the palette are commercially available and for a
decent price. When you would have preselected such a set, then this last step is
not needed. Epilogue: What else is there to do?
Alternatively you can make works of art by selecting a
different colour engine (e.g. black and white, just two colours are required) or
applying this set as a Ministeck® table (you should then have saved as 'Save table as Ministeck').
Basically any other
creative step is possible, because the saved table is identical to any other
(normal) colour-brick table.
The
first thing you need to do is to create the Standard Colour data set.
Fortunately we have already provided a few, but since most colour standards are
copyrighted, we can only include a slightly off-value data set
and avoid unnecessary lawsuits. The structure of the Standard Colour data set is
provided in the chapter on dataset structure (here ). For
now you can probably use the as-is data set from our installation files. In case
you like to make your own dataset: this website may be very helpful to
derive the real and accurate colour codes ('Colourcharts'). We used the source
code of the colour pages to quickly derive the colour code, RGB values and
the colour description. Legal and accurate
:-)
Start Brickaizer. It will
start using the last used (normal) dataset.
Select via the main
menu 'Special functions' > 'Paintbrush colours'. This will open a new (small)
window.
Select from the pull-down
box the RAL Classic data set. It will show the
individual colours, but not the colour dots in the overview on top because
it's not yet active.
To
activate the Standard Colour feature, simply click on the still empty area, now only showing a text 'Click here to
activate the Standard colours' and press the 'Yes' button (a warning will pop-up first). The Standard Colour
set will now become active, the overview in the previous window is now
shown, and the colour list in the main application windows now also shows all
the standard colours. In the status bar you will notice that the 'Colour set: RAL Classic' is now the active set.
Basically the full data set has now been replaced by the Standard Colours
set.
You can
now safely close the pop-up window.
You don't need these any more as a preparation.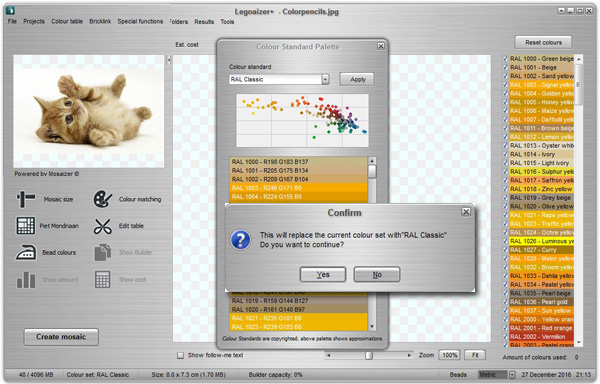
This is the
easiest step: press the 'Create mosaic'
button and wait until the mosaic is
finished. This may take a while since there are quite a number of colours to
choose from, and optimize the mosaic. Our size in this example is 56 x70 studs.
and it took about 4 seconds to complete the mosaic. You will get a warning
about the number of colours are too much for a proper output in the excel
result file. This is the corresponding screenshot:
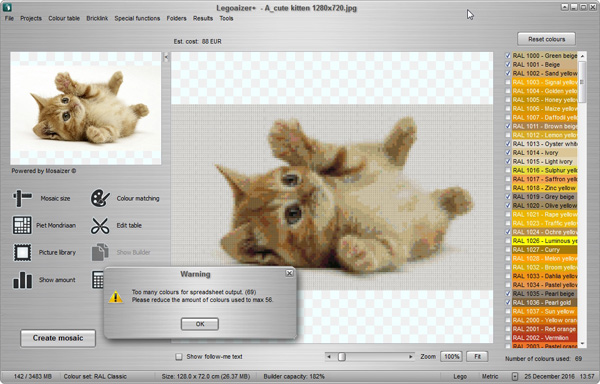
You won't probably want to keep a stock of 92 colours, so you need
to bring the amount of colours drastically down, without sacrificing too much of the
quality of the mosaic. There are two methods (like a normal mosaic, but here it
pays off to use this feature)
Press the Colour matching
button again, and select a decent number of colours. We choose 24 as the 'Limit to # of colours'.
As 1, but now also tick the
checkbox 'Iterate down to exact # of colours'.
The last step in making perfect mosaics
with standard colours is to save the result and the corresponding colour set.
Basically, you can treat the standard colours as any other table of colours and
bricks. The standard colours have no brick restrictions, so all the colour-brick
combinations are possible. To see this in action, open the table editor by
pressing the 'Edit table' button. Now you can see
that all the colours and bricks are fully applicable. The default selection
is a brick with 1x1,
1x2, 1x3, 1x4, 1x6, 1x8, 2x2, 2x3, 2x4, 2x6 and 2x8
studs.

The use of the standard colour data files
is a very powerful approach to combine any kind of colour that you want. You can
create a mixed pallet from two different standards (if available as spraypaint,
or as paintbrush paint, or any other means to recolour a brick). You might even
want to combine brick colours with standard colours to reuse your current set of
bricks. But when doing so the brick colours are then defaulted to the 11 types
of bricks. You might need to manually deselect the
non-existent colour-bricks combinations in the Colour
table editor. But once done is remain applicable for
many projects.